Tables
This tool allows you to arrange data such as text, images, links, forms, etc. - into columns and rows of cells. You may also include a caption for your table, providing a short description of the table's purpose.
Who has access:
You must have one of the checked permissions to use this manager.
Guest
Member
Contributor
Editor
Administrator
Group Contributor
 Create an insertion point for the table by using your mouse and placing your cursor in the editor where you intend to insert the table.
- Select the Insert/Edit Table icon from the Editor Toolbar.
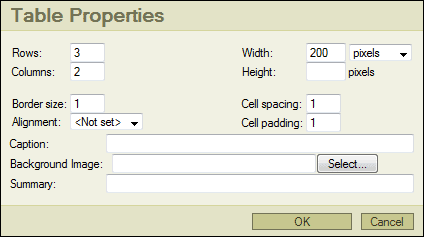
- ROWS: Enter the number of rows for your table.
- COLUMNS: Enter the number of columns for your table.
- BORDER SIZE: Enter 0 if you do not want a border on your table. The higher the number, the larger your border.
- ALIGNMENT: Select your table alignment from the drop down list.
- WIDTH: Enter the width of your table in pixels or as a percentage.
- HEIGHT: Enter the height of your table in pixels.
- CELL SPACING: Enter the amount of spacing you want around the table cells.
- CELL PADDING: Enter the amount of padding you want inside the table cells.
- CAPTION: Enter a caption for your table if necessary. This will appear centered across the top of your table.
- BACKGROUND IMAGE: Select an image from your My Files area to set as the background image for your table. Text will appear on top of this image.
- SUMMARY: Enter a summary for your table. The text you enter specifies a summary of the content of the table. The information does not appear on your website.
- Click OK to insert your table or Cancel to exit the Insert/Edit Table dialog box.
- Click the Save
 icon in the upper right corner of the screen to save your work.
 Select your table by left-clicking anywhere inside the appropriate table cell
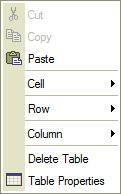
- Right-click inside the cell to bring up the update table options dialog.
- Select the appropriate action for the task you are trying to accomplish.
- CELL: By selecting Cell, you will have the opportunity to do the following:
- Insert Cell: Insert a new cell before or after the selected cell.
- Delete Cells: Delete the selected cell or cells.
- Merge Cells: Merge cells across the column. To merge cells, highlight the contents of both cells. Right-click the highlighted content in one cell and select Merge Cells.
- Split Cells: This will split one cell into two cells.
- Cell Properties: Set properties for the selected cell using the Cell Properties dialog box.
- ROW:
- Insert Row: Insert a row before or after the selected row.
- Delete Rows: This will delete the selected row or rows.
- COLUMN:
- Insert Column: This will insert a column before or after the selected column.
- Delete Columns: This will delete the selected column or columns.
- DELETE TABLE: Select this option to delete the entire table.
- TABLE PROPERTIES: Set your table properties using the Table Properties dialog box.