Web Administrator's Guide
Friday, May 03, 2024
Getting Started

Getting Started


Website Setup: Technical Requirements

In order to edit your site, you should use a computer with one of the following browsers:
  1. Firefox
  2. Internet Explorer 6 or greater
  3. Safari 3 or greater
  4. Google Chrome

Website Setup: Help Resources

Our goal is to help you learn how to use our product in a way that maximizes your online ministry's effectiveness in communication and outreach. We've provided several paths for product support while using our application.

Online Support

Our online resources are available to you 24/7. Along with the step-by-step Help Manual, we also have an extensive Knowledge Base at your disposal. These are great tools to use when you quickly need to find a solution to your inquiry. You can also view our short "Getting Started" video which covers some of the material in this document in an audio-visual format.

Email Support

Free email support is available 8:00am - 6:00pm M - F Central Time. Explain the issue you are having and a member of our team will reply to your email during the hours listed above. Please allow up to 1 business day for a response to your email.

Phone Support

Free phone support is available 8:00am - 6:00pm M - F Central Time. A toll-free number is available on the Help Manual Home page. Please have your Site ID available when you call. Your Site ID can be found in the order confirmation you received when you ordered the site or at the top of your Account manager.
 

Website Setup: Login to Your Website

This is the first and most important step to building your site. Below are the steps you will take to access your Website Control Panel.
  1. Make sure you have your Site ID, Username and Password in front of you. These can be found on the order confirmation you received via email. If you have misplaced this information, see the next topic below for retrieving login information.
  2. Access the Internet using your normal method of getting online.
  3. Navigate to the Website Control Panel Login form.
  4. Enter your Site ID, Username and Password in the corresponding blanks.
  5. Once you have entered your information, click the "Login" button to proceed.

Website Setup: Retrieve Login Information

If you have forgotten or misplaced your login information, click the Forgot Password button and enter the email address you supplied when you ordered your site. You will be emailed Site ID's, Usernames, and Passwords for all sites where a match is found for the email address.
 
WARNING: Because email is not secure, we recommend changing your username and password immediately upon logging into the Control Panel after using the Forgot Password feature.
 

Website Setup: Additional Login Features

We've included a couple of optional features to the login process which may prove to be helpful based on your needs.

Keep Me Logged In

To enhance system security and performance, user logins only remain active for up to 20 minutes between page requests. For your convenience, we can temporarily save your login information on your computer and automatically reactivate your login for up to 24 hours from your last page request.
 
Because your login information will be stored on the computer's hard drive until you log out (even if you disconnect from the internet, close your browser, or turn off your computer), you should always select the "Exit" button in the upper right corner of the main control panel screen once you have completed your web site administration.
 
WARNING: We do not recommend selecting the "Keep Me Logged In" option if you are using a public or shared computer because forgetting to log out could allow unauthorized persons access to your web site control panel.

Use SSL Session

Although your username and password are always encrypted during the login process, you now have the option of encrypting all information passed between your computer and our servers while you are working on your web site. Because of the added layer of processing required to encrypt and decrypt data for each request on both the client and the server, you will experience slower response times when using an SSL session; therefore, we recommend using an SSL session only when it is absolutely necessary.
 
NOTE: You do not need to select the "Use SSL Session" check box for your username and password to be encrypted during login. You should only select the "Use SSL Session" check box when you plan to send or receive highly sensitive data such as financial information.
 

Website Setup: Control Panel

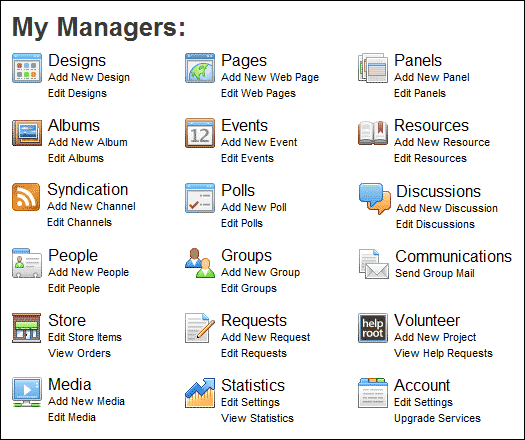
Once you login, you will be directed to your website Control Panel. Depending on the Package level you purchased, all managers shown below may not appear in your Control Panel.
 
Control Panel
 

Common Features: Overview

My Files

My Files

This icon will open your My Files area where you will manage your files included on your Website.
Customer Support

Customer Support

This icon allows you contact us with comments, suggestions, or application error messages.
Archive Record

Archive Record

This icon allows you to archive the pages of your website in case you need them for future use. When clicked, the last saved version of the page you are on is emailed to the current logged in user as a HTML document.
Email Record

Email Record

This icon opens the Communications manager and allows you to email the current page to selected groups or to individual email addresses. Note: You must have the Communications manager for this icon to appear.
Help

Help

This icon allows you to access the online help manual.
Preview

Preview

This icon allows you to preview to your work.
Save

Save

This icon saves your work.
Exit

Exit

This icon will exit the current screen and return to the previous screen. Make sure to save any changes you wish to keep before closing a screen.
Add

Add

This icon will add a new piece of content such as a page, event or content panel.
Delete

Delete

This icon will delete a piece of content such as a page, event or content panel.
Show/Hide Options

Show/Hide Options

This icon will show or hide options associated with a piece of content such as a page, event or content panel.
Copy Page

Copy

This icon will duplicate a piece of content for ease of use when creating multiple items with the same layout.
 

Quick Navigation

This icon allows you to display a list of links to all managers, allowing you to quickly jump from one manager to another.
 
Quick Links


Select a Design: Design Selection

Use the Default Design dialog box to select the design that will be applied to all pages within your web site.
 
Default Design
  1. Select the Designs manager icon. This will be the first icon on your Control Panel, just below the words, "My Managers."
  2. Click the Default Design tab.
  3. Search all available designs by clicking the Search button. You may optionally narrow your search results by selecting a design style and/or color from the drop-down lists.
  4. To preview a design full-size, click the design's thumbnail in the search results.
  5. To set your Website's default design, select the design's name below the corresponding preview thumbnail.
  6. Click the Save Save icon in the upper right corner of your screen to save your design selection.
  7. Click the Close icon in the upper right corner to close the Default Design window.
  8. Click the Exit Close icon in the upper right corner of your screen to exit to your Control Panel.
Note: You may also use the Designs manager to select additional designs within the system, modify our system designs or create your own custom designs.
 

Create Home Page: Home Page Settings

Home Page Settings
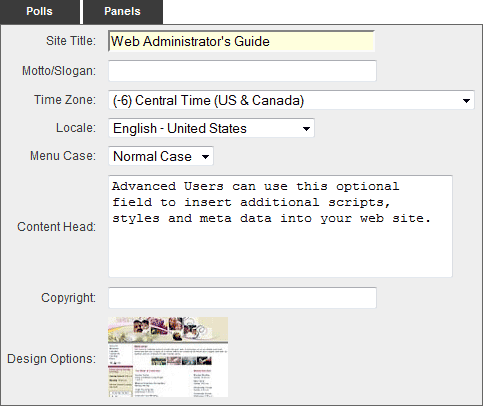
This allows you to add content to your Home Page and select default settings for your entire website.
  1. Select the Pages icon. This will be the second icon shown from left to right.
  2. Click the Home Page Settings tab
  3. SITE TITLE: Enter the name of your organization. The information typed in this field will appear at the top of your main page. This field is required. The rest of the fields in the Home Page Settings screen are optional.
  4. MOTTO/SLOGAN: If your organization has a motto or slogan, enter it here. This will appear on the home page of your site. (Please note: not all designs support the motto/slogan, therefore in some cases it will not appear.)
  5. TIME ZONE: This is the time zone where your organization is located.
  6. LOCALE: You can select the language and region for the country where your organization is located.
  7. MENU CASE: Select your menu default case. You can select normal, upper or lower case.
  8. CONTENT HEAD: Advanced users can use this optional field to insert additional scripts, styles and meta data in your web site. Please note: Our technical support staff does note support this advanced user option.
  9. COPYRIGHT: Add your own copyright information to the existing copyright text. Your information will appear to the left of the existing text.
  10. DESIGN OPTIONS: Click the design option that is currently shown. A window will appear with the other designs you made available in the Additional Designs section of the Designs manager. Select the design you want to apply to this page.
Back To Top

Create Home Page: Add Home Page Content

Editor
  1. Using the Page Editor as seen above, type your content in the area provided below the Editor Toolbar.
  2. When finished, click the Save Save icon in the upper right corner of your screen to save your Home Page Settings
  3. Click the Exit Close icon in the upper right corner of your screen to exit to your Control Panel. 
Note: For help with the functionality of the Page Editor, see Using the Editor for more information regarding the use of images, forms, hyperlinks and many other great features to help you create your Home page.
 

Search Engine Settings: SEO Settings
SEO Settings

Search Keywords

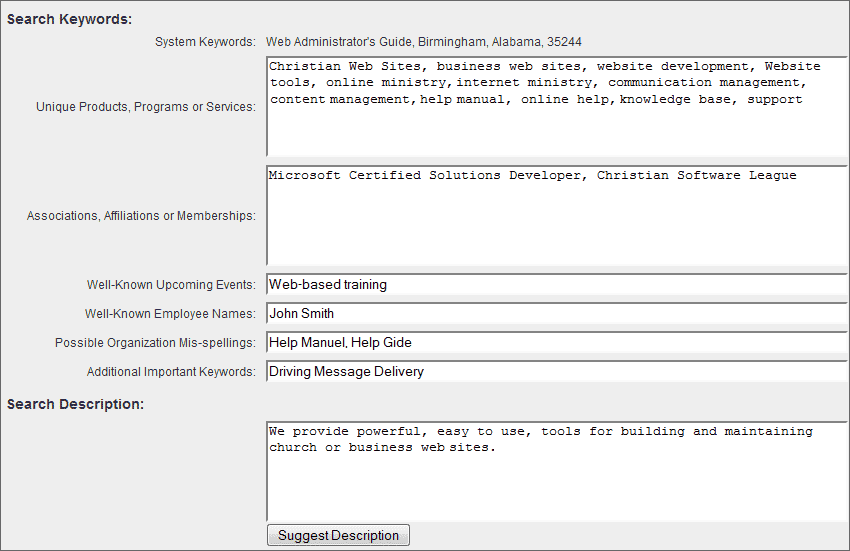
This is the information some search engines will use to match your organization with the search engine criteria entered by search engine users.
  1. SYSTEM KEYWORDS: Basic organization information we are automatically generating for you.
  2. UNIQUE PRODUCTS, PROGRAMS OR SERVICES: Enter keywords relating to products, programs or services unique to your organization.
  3. ASSOCIATIONS, AFFILIATIONS OR MEMBERSHIPS: Enter any associations, affiliations or memberships your organization has.
  4. WELL-KNOWN UPCOMING EVENTS: Enter upcoming events that are known to be associated with your organization.
  5. WELL-KNOWN EMPLOYEE NAMES: Enter employee names that are known to be associated with your organization.
  6. POSSIBLE ORGANIZATION MIS-SPELLINGS: Enter possible alternate spellings a user may enter for your organization name.
  7. ADDITIONAL IMPORTANT KEYWORDS: Add any additional important keywords that do not fall within one of the previous fields.

Search Description

This is the information most people will see in the search engine results when your organization matches one of the keywords they entered.
  1. Enter or update your Search Description using the text area field provided.
  2. Or, click the Suggest Description tab and we'll suggest a description for you based on your keywords. Please note this is only a suggestion and you will need to edit the information accordingly before saving.
  3. Click the Save Save icon in the upper right corner of your screen to save your Search Engine Settings.
  4. Click the Exit Close icon in the upper right corner of your screen to exit to your Control Panel.
 

Add New Page: Adding a New Page

  1. Click the Pages manager icon.
  2. Click the Add New Page Add New Page icon to the right of the Show All Pages button.
  3. Create a title for your page by typing the page name in the Title field.
  4. Fill out the Search Summary text area as this will help with Search Engines and will help users searching your site.
  5. Use the Page Editor to add content to your page.
For more information about creating pages, please visit the Pages manager section of the Help Manual.
 
Alright. You're off to a great start. Using the tools provided within your Control Panel, you can do many things such as create events, photo albums, blogs and podcasts.
 
As you continue forward, make sure you take advantage of the step-by-step Help Manual, the detailed Knowledge Base and our first class customer support. Thanks for choosing us as your Application Service Provider. It is our pleasure to be able to work with you as you build and maintain your Website presence.